Lets Get Inky with Brushes: An Inktober Series
This Inktober, I challenge you to give inking with a brush a shot! Inking with a brush is a skill that takes practice, but can be quite rewarding.

Inking with a brush can seem intimidating. What brushes do I use? What papers? What inks? Brushes are hard to control for fine lines- how do you transition from single lineweight pens, like fineliners to brushes? Where do I buy my supplies? How do I become proficient?
Over the years, and through past Inktobers, I've written and recorded loads of information to inspire you to pick up the brush and ink! It's a pleasure to compile these resources to help others learn the ins and outs of brush inking. As always, if you have any questions, don't hesistate to email me using the sidebar form- your questions help me plan better content!


Basics For Brushes
Robust Inking Toolkit Guide for Professional Artists:
What to Look for In An Inking Brush:
Recommended Brushes for Inking:
For more on brush selection, check out this guest post by Heidi Black.
Where to buy brushes?
IN PERSON (whenever feasible):
Dick Blick
Jerry's Artarama
Paper and Ink Arts
Online:
Jerry's Artarama
Dick Blick
Paper and Ink Arts
Prepping Watercolor Brushes for First Use:
Also applicable for inking brushes
Before inking, know what your end product will be, and what media you want to use on top of your inks.
Marker
Watercolor
Mixed Media?
Recommended Inks:
Indian Inks:
There are many Indian inks on the market, so your preference may differ from mine. Most Indian inks contain shellac, which allow them to dry waterproof. Shellac reactivates with alcohol, such as alcohol markers.
Acrylic Inks:
Acrylic inks are made from acrylics, which are plastisols. Plastisols harden when dried, and will be difficult to remove if you allow them to dry in your brush, so you need to clean your brushes well after use. Plastisols are alcohol solvent, and not compatible with alcohol markers.
Walnut Inks:
Walnut inks are made from black walnuts, and are organic matter inks. This traditional ink is dark brown in color, and can be fun to play with.
Deleter Inks
Inking Tips:
Where to buy inks:
Dick Blick
Amazon
Jerry's Artarama
Paper and Ink Arts
Deleter Shop
What to look for in papers for inking with a brush:
Recommended Papers:
Cellulose based watercolor papers
Where to Buy Papers:
Dick Blick
Amazon
Jerry's Artarama
Paper and Ink Arts
Deleter Shop
Inktober Inking Demo:
Brush Inking Tips with the ArtSnacks Inktober Collection:
Inking Your Character to Life With a Brush, P1:
Size Matters! Brush Demonstration:
Cartoony Inking with a Size 4 Brush:
Inking Demonstrations:
Animals:
Brush Inking Assignment: Chinchilla:
Scenery:
Inking Assignment: Woods:
Portraits:
Inking Assignment: Elizabeth Taylor:
Cartoony Art:
Inking Practice: Faces
Inking Sailor Jupiter and Venus for Inktober:
Inktober Day 24- Yotsuba Timelapse:
Inktober Day 25- Tsukimi (Princess Jellyfish) Timelapse:
Inking on Black Paper with White and Gold Ink:
Inking Techniques:

Inkwash: Inkwash can give your work a midtone (or several midtones), which is often helpful for establishing mood, particularly in dark scenes like this nightclub. Inkwash is fairly simple to do and is similar to watercolor. Make sure you water down your ink in a separate container (small ceramic ramekins or dixie cups are ideal for this), and strongly consider making swatches beforehand.
Drybrush: Can also give your work midtones, but I personally feel that it makes the work look kind of dirty. This can be fine for certain artstyles, but if you have a clean artstyle, you should probably reconsider drybrush. Drybrush is applied using a dried brush that has had the majority of the fresh ink removed (usually on a scratch sheet of paper). Drybrushes can be any beat up old brush that you have lying around, I do not recommend doing it with your nice brushes, and it's pretty hard to consistently drybrush using a brushpen. The best results I've had with brushpen is on vellum plate.
For more about inking techniques, and how to achieve them, check out this guest post by Sarah Benkin.
Brush Care:
Materials:
For peak performance, inking brushes require not only frequent cleaning, but also frequent conditioning. Cleaning brushes strip the hairs of their oils, which can lead to spread bristles, so you're going to want to recondition them occasionally.
Restoring Damaged, Frayed, or Bent Brushes
Brushes can require a little extra TLC, be it cheap watercolor brushes or expensive inking brushes. The love you lavish on your expensive brushes can be shared with your inexpensive brushes to extend their lives.
Regular cleaning can work wonders for gunked up brushes. Although many cartoonists recommend brush soap, I find that using a bar shampoo (like in my Akashiya Brush Tip restoration post) can really work wonders on your brush without stripping natural hair brushes of their essential oils. To loosen stubborn ink deposits, work the shampoo deep into the belly of the brush, and let the brush soak in warm water.

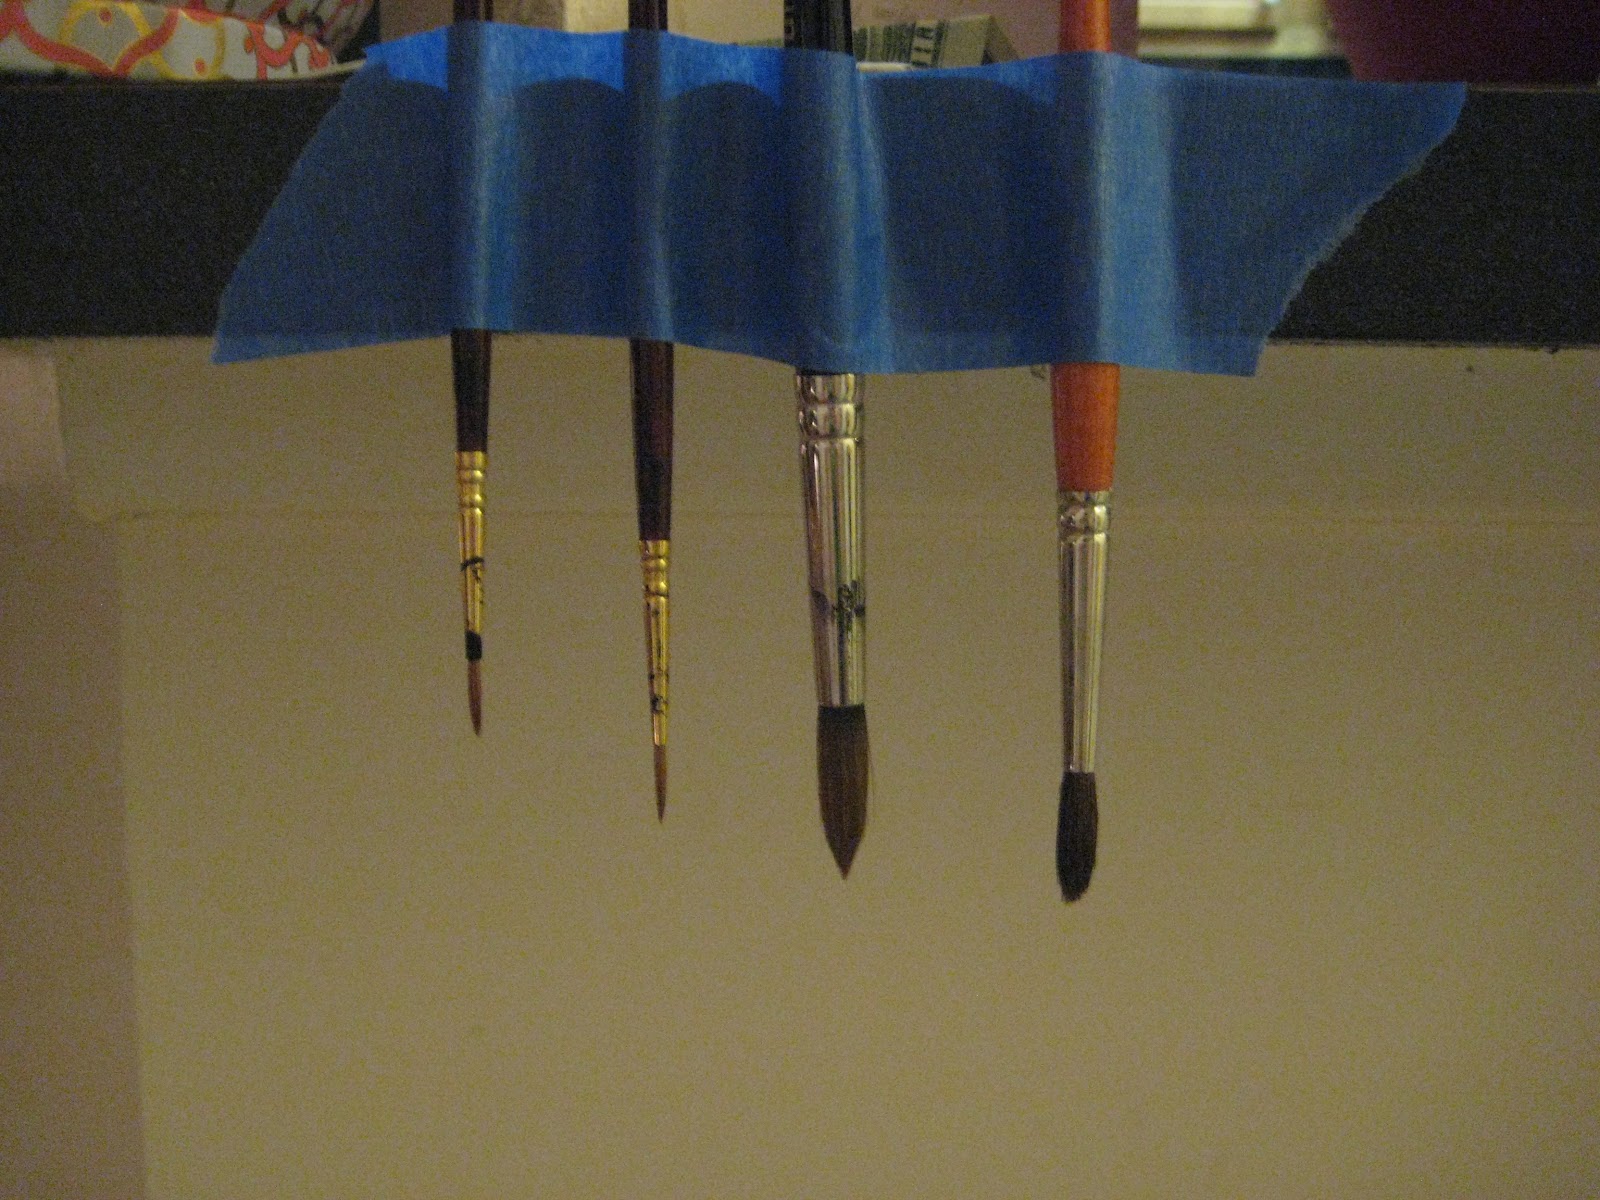
When soaking your brushes, be careful not to just let your brushes rest in the water. Water will get in between the metal ferrule and the wooden handle, and cause warping, and ruin the brush. You can jerry-rig a tape holder to keep your brushes at just the right depth in the cup you're using. This technique can also be used to straighten a bent brush (shown in the picture) letting gravity do all the work.
With inking brushes, you should take great care to make sure the tip doesn't get damaged. After inking (or cleaning) roll the brush between your finger tips in one direction to restore the original point. Letting your brush dry splayed out will ruin the bristles.
When drying, you can tape your brushes to a counter top brush end down to protect the bristles.
 These brushes'll need some extra work (there's still ink up in the ferrule). Gunked up brushes may require repeated washes.
After your brush is clean, you'll want to restore it's tip, You can do this every time you dip it in water or ink by simply rolling it across a piece of scrap paper. Before storage, make sure you roll the tip to preserve that nice tip.
For more information about taking care of your brushes, check out this post on Brush and Nib Care.
How to Improve Your Brush Inking
PRACTICE
While Inking Or Before:
Outside Resources, Second Opinions, and More Information
ArtSnacks Inktober Collection Review (written)
Make Inktober 2016 A Month to Remember

Inking with a brush can seem intimidating. What brushes do I use? What papers? What inks? Brushes are hard to control for fine lines- how do you transition from single lineweight pens, like fineliners to brushes? Where do I buy my supplies? How do I become proficient?
Over the years, and through past Inktobers, I've written and recorded loads of information to inspire you to pick up the brush and ink! It's a pleasure to compile these resources to help others learn the ins and outs of brush inking. As always, if you have any questions, don't hesistate to email me using the sidebar form- your questions help me plan better content!
Basics For Brushes
- Brushes go up in size sequentially, and can begin at 000 (far to small for most artists' use) up to 40 (huge)
- Most artists use 0, 1, 2, and 4 size brushes
- Brushes can be made from a variety of materials, but most inkers prefer Kolinsky sable for inking
- Brushes handle differently from brush pens, even if the brush pens have nylon bristles
- Brushes are an investment, and if well cared for, can last many years
Robust Inking Toolkit Guide for Professional Artists:
What to Look for In An Inking Brush:
- Kolinsky Sable makes for great inking brushes- comes to a very fine point, holds a lot of water, and does not 'dump' ink or paint the way synthetics do
- Brush should come to a fine point when wet, not splayed out
- Tip of brush shouldn't be ragged
- Wooden handle should not be cracked- lacquer should have an even coat
- Metal ferrule should be crimped tight
- Should not shed hairs
- No stray hairs
Recommended Brushes for Inking:
- Creative Mark Rhapsody Kolinsky Sable (Jerry's Artarama)
- Winsor and Newton Series 7 (Sold almost everywhere, but you may have to ask)
- Princeton Kolinsky Sable 7050 (Available through DickBlick)
For more on brush selection, check out this guest post by Heidi Black.
Where to buy brushes?
IN PERSON (whenever feasible):
Dick Blick
Jerry's Artarama
Paper and Ink Arts
Online:
Jerry's Artarama
Dick Blick
Paper and Ink Arts
Prepping Watercolor Brushes for First Use:
Also applicable for inking brushes
Before inking, know what your end product will be, and what media you want to use on top of your inks.
Marker
Watercolor
Mixed Media?
Recommended Inks:
- Kaimei Sol K (Copic proof, not waterproof)
- Winsor and Newton India Ink (both waterproof and non-waterproof are fine)
- FW Indian Ink
- Acrylic Ink- FW Acrylic Ink, Liquitex Acrylic Ink (waterproof, not Copic Proof)
- Sumi ink
- Walnut Ink
Indian Inks:
There are many Indian inks on the market, so your preference may differ from mine. Most Indian inks contain shellac, which allow them to dry waterproof. Shellac reactivates with alcohol, such as alcohol markers.
Acrylic Inks:
Acrylic inks are made from acrylics, which are plastisols. Plastisols harden when dried, and will be difficult to remove if you allow them to dry in your brush, so you need to clean your brushes well after use. Plastisols are alcohol solvent, and not compatible with alcohol markers.
Walnut Inks:
Walnut inks are made from black walnuts, and are organic matter inks. This traditional ink is dark brown in color, and can be fun to play with.
Deleter Inks
- Deleter 6 is alcohol marker resistant, but not waterproof
- Deleter 4 smudges a little with both marker and watercolor- moreso with Copic than with other alcohol markers
- Deleter 3 is waterproof
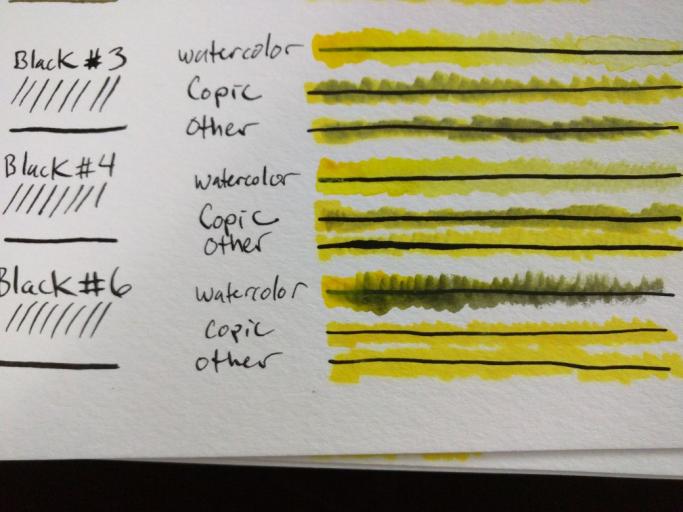 |
| This compatibility test was provided by Kabocha and used with permission. |
Inking Tips:
- Allow your inks to 'cure' overnight before erasing or adding color
- Work with a cover sheet to protect your paper and help minimize smearing
Where to buy inks:
Dick Blick
Amazon
Jerry's Artarama
Paper and Ink Arts
Deleter Shop
What to look for in papers for inking with a brush:
- A textured finish will encourage fun effects like drybrush
- A smooth finish is easier to control
- Ink dries fairly fast- does not stay wet for long periods of time- coated papers have longer dry times
- Thicker papers that can handle the water in ink without buckling
Recommended Papers:
- Strathmore 500 Series Smooth Bristol
- Strathmore 500 Series Plate Bristol
- Strathmore 500 Series Mixed Media Paper- Vellum Finish (cotton based paper)
- Illustration board
Cellulose based watercolor papers
- Fabriano Studio
- Strathmore Watercolor Paper
- Canson Montval
- Canson Biggie
- Watercolor board
Where to Buy Papers:
Dick Blick
Amazon
Jerry's Artarama
Paper and Ink Arts
Deleter Shop
Inktober Inking Demo:
Brush Inking Tips with the ArtSnacks Inktober Collection:
Inking Your Character to Life With a Brush, P1:
Size Matters! Brush Demonstration:
Cartoony Inking with a Size 4 Brush:
Inking Demonstrations:
Animals:
Brush Inking Assignment: Chinchilla:
Scenery:
Inking Assignment: Woods:
Portraits:
Inking Assignment: Elizabeth Taylor:
Cartoony Art:
Inking Practice: Faces
Inking Sailor Jupiter and Venus for Inktober:
Inktober Day 24- Yotsuba Timelapse:
Inktober Day 25- Tsukimi (Princess Jellyfish) Timelapse:
Inking on Black Paper with White and Gold Ink:
Inking Techniques:

Inkwash: Inkwash can give your work a midtone (or several midtones), which is often helpful for establishing mood, particularly in dark scenes like this nightclub. Inkwash is fairly simple to do and is similar to watercolor. Make sure you water down your ink in a separate container (small ceramic ramekins or dixie cups are ideal for this), and strongly consider making swatches beforehand.
Drybrush: Can also give your work midtones, but I personally feel that it makes the work look kind of dirty. This can be fine for certain artstyles, but if you have a clean artstyle, you should probably reconsider drybrush. Drybrush is applied using a dried brush that has had the majority of the fresh ink removed (usually on a scratch sheet of paper). Drybrushes can be any beat up old brush that you have lying around, I do not recommend doing it with your nice brushes, and it's pretty hard to consistently drybrush using a brushpen. The best results I've had with brushpen is on vellum plate.
Source: The Inking Compendium
For more about inking techniques, and how to achieve them, check out this guest post by Sarah Benkin.
Brush Care:
Materials:
- General's The Master's Brush Soap, or Baby Shampoo
- Inexpensive Hair Conditioner
- Cups
- Blue Painters Tape
For peak performance, inking brushes require not only frequent cleaning, but also frequent conditioning. Cleaning brushes strip the hairs of their oils, which can lead to spread bristles, so you're going to want to recondition them occasionally.
Restoring Damaged, Frayed, or Bent Brushes
Brushes can require a little extra TLC, be it cheap watercolor brushes or expensive inking brushes. The love you lavish on your expensive brushes can be shared with your inexpensive brushes to extend their lives.
Regular cleaning can work wonders for gunked up brushes. Although many cartoonists recommend brush soap, I find that using a bar shampoo (like in my Akashiya Brush Tip restoration post) can really work wonders on your brush without stripping natural hair brushes of their essential oils. To loosen stubborn ink deposits, work the shampoo deep into the belly of the brush, and let the brush soak in warm water.
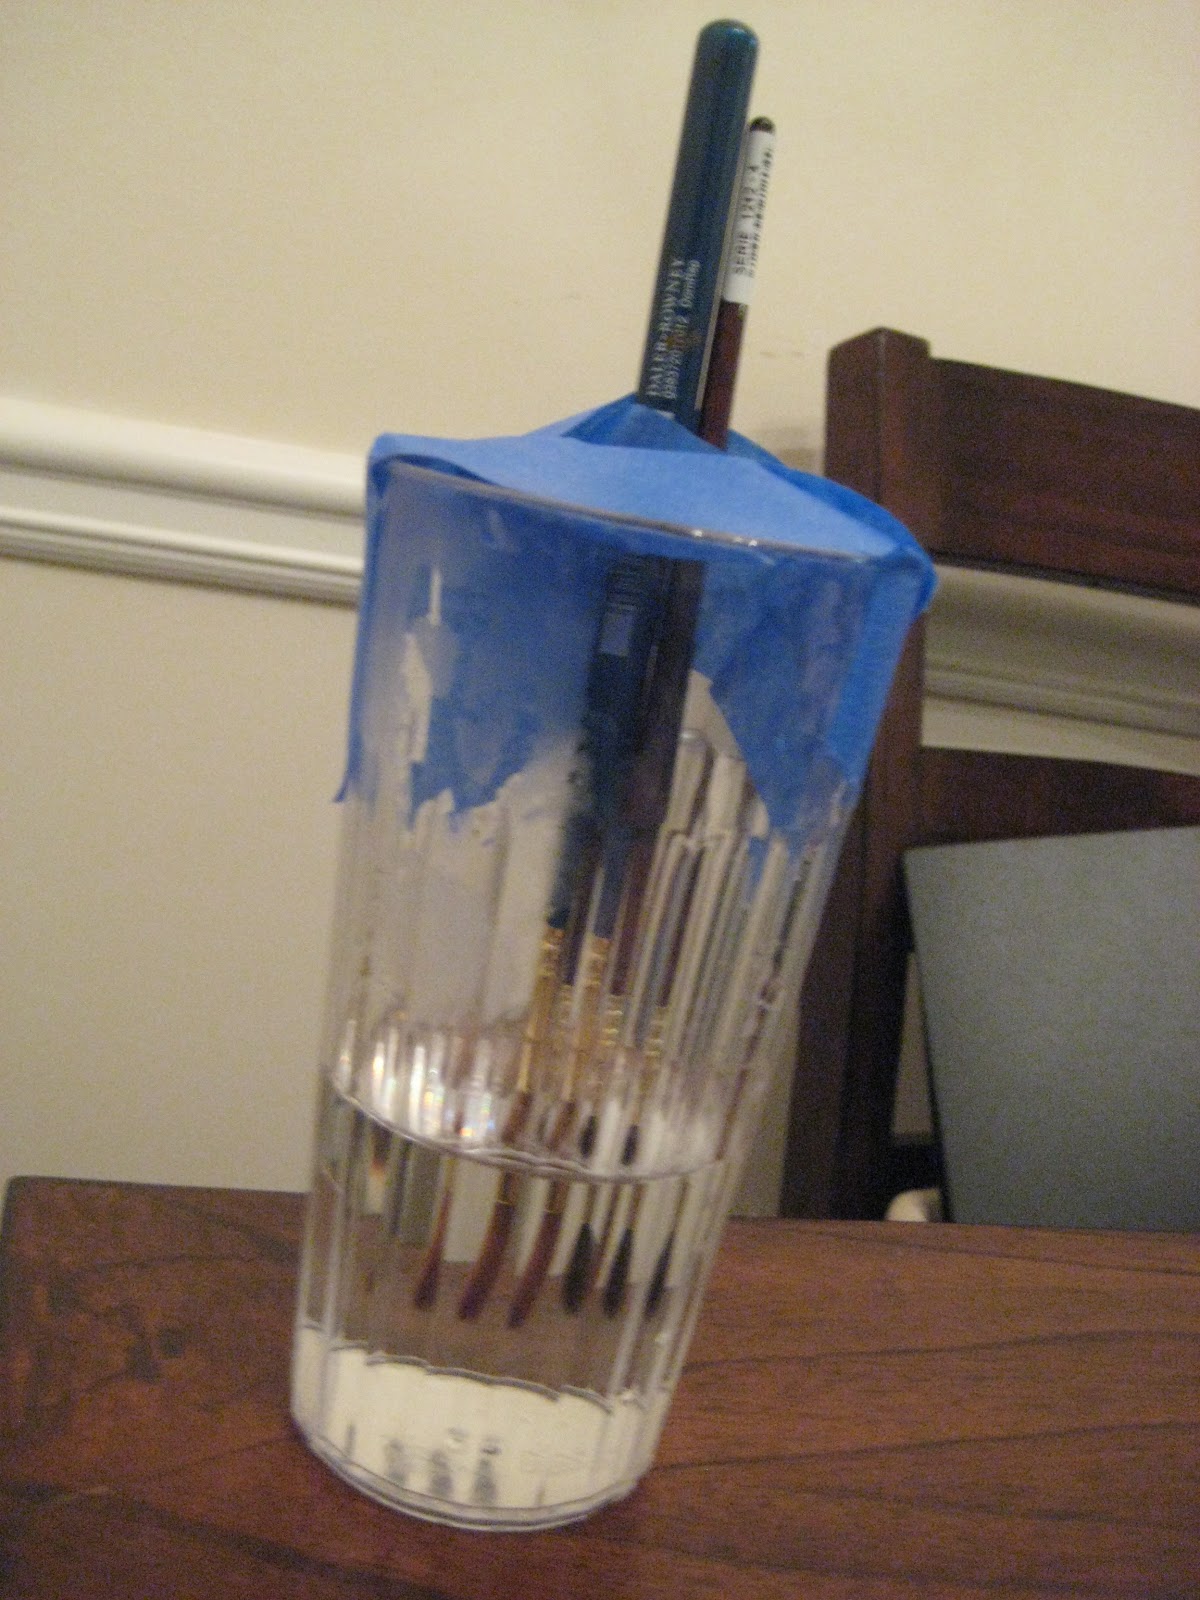
When soaking your brushes, be careful not to just let your brushes rest in the water. Water will get in between the metal ferrule and the wooden handle, and cause warping, and ruin the brush. You can jerry-rig a tape holder to keep your brushes at just the right depth in the cup you're using. This technique can also be used to straighten a bent brush (shown in the picture) letting gravity do all the work.
With inking brushes, you should take great care to make sure the tip doesn't get damaged. After inking (or cleaning) roll the brush between your finger tips in one direction to restore the original point. Letting your brush dry splayed out will ruin the bristles.
When drying, you can tape your brushes to a counter top brush end down to protect the bristles.
After your brush is clean, you'll want to restore it's tip, You can do this every time you dip it in water or ink by simply rolling it across a piece of scrap paper. Before storage, make sure you roll the tip to preserve that nice tip.
For more information about taking care of your brushes, check out this post on Brush and Nib Care.
How to Improve Your Brush Inking
PRACTICE
- Practice from reference
- Practice from life
- Practice from imagination
- Skill drills
While Inking Or Before:
- Warmup your hand with warmup sketches
- Ink when you are calm and relaxed
- Control your breathing
- Listen to calming music if you have difficulty pulling clean lines
- Don't ink when hungry- low blood sugar can make your hands shake
Outside Resources, Second Opinions, and More Information
ArtSnacks Inktober Collection Review (written)
Make Inktober 2016 A Month to Remember
Comments
Post a Comment